To make an Android app, developers choose the tech stack, design the interface, set up the development environment, and code the app. Testing, debugging, and optimizing are mandatory steps before deploying the app on the Google Play Store. These steps ensure consistent navigation, stable performance, and timely updates for end-users.
To develop an Android app, the steps to follow are:
- Choosing the right tech stack
- Planning and designing your app set up the development environment
- Building core features and functionality
- Testing and debugging the app
- Deploying and publishing to the Google Play Store
To develop a custom Android app, choose the specific functionalities and features that cater to the target audience’s needs. Integrating backend systems and ensuring reliable data exchange between app components is necessary for custom development.
Maintaining an Android app involves regular updates, bug fixes, and enhancing features based on user feedback. Optimizing Android app performance includes profiling, reducing battery consumption, and improving response times to ensure fast and stable performance.
According to a 2024 report by Statista on mobile app performance, consistent testing and optimization can reduce app crashes and increase user retention by 30%.
Step 1: Choose The Right Tech Stack
The Android tech stack is the set of languages (Kotlin/Java), IDE/build tools (Android Studio, Gradle), UI toolkits (XML layouts or Jetpack Compose), and libraries (e.g., Android Jetpack, Retrofit) used to build the app. Choosing the right stack depends on your app’s complexity, future plans, and your team’s experience. Kotlin, with Jetpack Compose, is ideal for building modern, responsive apps quickly, while Java is the preferred option for maintaining older codebases. The chosen stack directly influences performance benchmarks, usability consistency, and development timelines. The choice of Android tech stack affects how easily developers can ship updates and add features. A carefully selected Android tech stack reduces defects and minimizes rework during maintenance.
The main programming languages for Android development are Kotlin and Java. Google introduced Kotlin as the preferred language for Android, and it is known for its modern syntax, safety features such as null-safety and type inference, and compatibility with existing Java codebases. Java, on the other hand, is the traditional language for Android development and is still widely used, especially for legacy projects.
Android Studio is Google’s official IDE for Android development, built on JetBrains’ IntelliJ IDEA. Android Studio integrates the Android SDK, emulator, profilers, and Gradle to support coding, debugging, testing, and device compatibility. Jetpack Compose, Android’s declarative UI toolkit, replaces XML layouts, supports Material 3, and accelerates UI iteration by reducing boilerplate.
Step 2: Plan And Design Your App
Planning and design form the early stage of Android app development, where the app’s purpose (e.g., fitness tracking), functionality (e.g., push notifications, GPS integration), and user experience (e.g., simple navigation) are defined. The planning and design phase includes brainstorming ideas, conducting research, and creating design blueprints for the app. This stage ensures that the app aligns with user needs and business goals while focusing on usability and functionality.
Planning includes determining the app’s core features, such as user authentication, data storage, and push notifications. Planning defines user expectations and ensures consistent transitions between screens. Proper planning and design lay the foundation for a successful app by reducing development errors, speeding up iteration, and ensuring consistency in the user experience. Without clear wireframes or a defined UX strategy, the Android app development process becomes inefficient and leads to usability issues and inconsistent design. An app with clear navigation, consistent layouts, and optimized user flows reduces task completion time for account creation or checkout and supports repeat usage from both new and returning users.
Wireframing is the first step in the design process, providing a visual guide for the app’s layout and structure. For example, if you’re designing a food delivery app, your wireframes should include screens like the homepage, menu listing, cart, and checkout. Wireframing helps define how users navigate the app and complete key actions. The wireframe serves as a blueprint, helping designers and developers map out the app’s core components. UI/UX design principles focus on creating a user-friendly interface, such as using large touch targets, responsive layouts for different screen sizes, and intuitive navigation menus.
User flow refers to how users interact with the app, from opening it to completing specific tasks such as signing up, browsing products, or making a purchase. Following Material Design guidelines helps ensure that the app has a consistent look and feel, with optimized components and animations tailored to Android devices.
Step 3: Set Up The Development Environment
An Android development environment consists of the tools and software needed to build and test Android apps. The key component is Android Studio, the official Integrated Development Environment (IDE) for Android development. The Software Development Kit (SDK) provides libraries and APIs needed to build Android apps. A virtual device allows you to test the app on different simulated Android devices.
Setting up the development environment is important for efficient app compilation, testing, and debugging. A well-configured environment ensures proper compilation, testing, and compatibility with various Android devices. Without the correct setup of Android Studio, the SDK, and the virtual device, Android app development becomes slower and prone to errors.
To install Android Studio, download it from the official website and follow the installation instructions for your operating system. After installation, configure the SDK by selecting the necessary platforms and build tools for the target Android version. To test apps, set up a virtual device using the Android Virtual Device (AVD) manager. This tool simulates various screen sizes and device configurations.
Step 4: Build Core Features And Functionality
Building core features and functionality involves creating essential components such as navigation, user interface, and backend logic that define the app’s purpose and user experience. Building core features and functionality includes designing UI elements, implementing the Activity lifecycle, managing screen transitions, and integrating backend services.
The Activity lifecycle defines the sequence of states (such as onCreate, onStart, onResume, onPause, onStop, onDestroy) that an activity goes through during its lifetime. The Activity lifecycle manages resources, user interaction, and background behavior in Android applications.
UI components, including buttons, text fields, and lists, provide a responsive and intuitive interface. Clear navigation guides users through different screens, while backend integration ensures data is fetched, stored, and synchronized in real time.
A strong foundation in these areas ensures consistent navigation flows, stable backend response times, and adaptive layouts, which together shape measurable improvements in user retention.
Step 5: Test And Debug The App
Android app testing ensures that the app works as intended and is free of bugs or performance issues. Testing identifies and resolves errors early in development, which lowers the risk of high-cost fixes after release. Without thorough testing and debugging, Android apps are more likely to crash, run slowly, and lose data.
Testing and debugging rely on multiple strategies, such as unit testing, UI testing, and log analysis. Unit testing checks individual components or methods in isolation, while UI testing simulates user interactions to confirm that the interface behaves as expected. Logcat provides real-time monitoring of log messages and errors, helping developers trace issues during development.
Several tools support testing and debugging tasks, including JUnit, Espresso, Logcat, and Firebase Test Lab. JUnit and Espresso are popular for unit and UI testing, respectively. Android Studio’s built-in Logcat tool helps track logs and errors during app execution. Firebase Test Lab enables cloud-based device testing, while the broader Firebase suite supports analytics, crash reporting, cloud messaging, and backend integration.
Step 6: Deploy And Publish To Google Play Store
The Google Play Store is the official marketplace for Android apps, providing access to billions of users worldwide and enabling developers to reach a global audience. The Google Play Store offers tools to manage app listings, track downloads, and collect user feedback. Publishing to the Play Store allows users to easily discover, install, and update the app across a wide range of devices.
Deploying an Android app to the Play Store involves steps such as generating an APK or AAB file, configuring permissions, and meeting Google’s publishing requirements. Developers comply with Play Store privacy and security guidelines to protect users and ensure apps meet Google’s safety standards. In addition, permissions must be managed carefully, and global regulations like GDPR must be followed to safeguard user data.
ASO (App Store Optimization) improves an app’s visibility in search results and attracts more downloads by reaching target users. ASO (App Store Optimization) involves optimizing the app’s title, description, and keywords. Monetization strategies, such as in-app purchases and ads, are commonly integrated with ASO planning to expand revenue opportunities.
Tools like Android Studio generate APKs and ensure the app is ready for release. The Google Play Console manages app submissions, reviews analytics, and makes updates after the app is published.
How To Develop A Custom Android App?
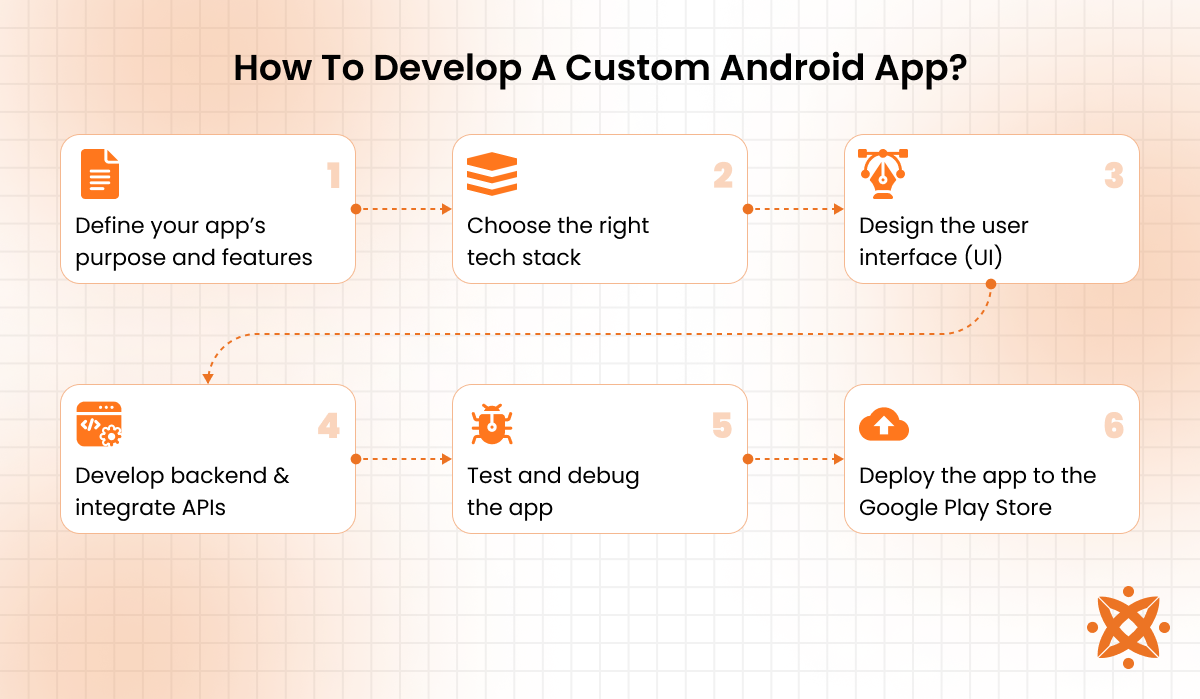
To develop a custom Android app, you must define its purpose, choose the right tech stack, design the user interface, develop its backend, test it thoroughly, and deploy it to the Play Store. The custom Android development process ensures the app meets specific goals and user needs while maintaining high performance and usability.
According to a study by Statista titled “Mobile App Development Trends,” 2023, 63% of developers use Kotlin as the primary language for custom Android app development, emphasizing its growing dominance.
To develop a custom Android app, the steps to follow are explained below:
- Define your app’s purpose and features: Define the app’s main objective and features to guide design and development decisions. Aligning the Android app with user needs increases retention and adoption rates over time.
- Choose the right tech stack: Choose programming languages such as Kotlin or Java, and frameworks like Android Studio and Jetpack Compose. The choice of programming language and framework impacts functionality, scalability, and efficiency by streamlining development and improving app stability
- Design the user interface (UI): Design an intuitive interface that follows Material Design guidelines to ensure consistency and usability. A clear and engaging Android app UI directly improves user retention and satisfaction.
- Develop the app’s backend and integrate APIs: Set up a backend system to manage data and server-side operations. Integrating APIs allows the app to extend its functionality by connecting to external services. Backend integration and API setup ensure a reliable app experience with dynamic content and features.
- Test and debug the app: Conduct comprehensive unit and UI testing to identify and resolve issues. Use tools like Logcat for debugging and confirm stable performance across different Android devices and OS versions to deliver a bug-free, reliable app.
- Deploy the app to the Google Play Store: After thorough testing, prepare your app for release by generating an APK or AAB file and ensuring it meets Play Store requirements. Submit it for review and use ASO (App Store Optimization) techniques, such as refining the title, description, and keywords, to increase visibility and reach a wider audience.
How To Create An App From Scratch?
To build an app from scratch, you must start with an idea, research the market, design the user interface, choose the tech stack, and implement the functionality. The process of creating an app involves conceptualizing the idea, developing it step by step, and ensuring it meets user needs with reliable performance.
As reported by the National Institute of Standards and Technology (NIST), over 60% of mobile developers emphasize usability and design as top priorities when building apps.
To create an app from scratch, the steps to follow are explained below:
- Start with a clear idea: Define the purpose and the problem the app will solve. A clear idea guides development and ensures alignment with the target audience.
- Conduct market research: Research competitors and analyze what users are looking for in similar apps. Understand trends, gaps in the market, and user preferences to refine your app’s features. Market research identifies gaps in competitor features and validates user preferences, allowing the app to address specific user requirements.
- Design the user interface (UI): Develop wireframes and mockups to visualize the layout. Focus on user experience (UX) to create an intuitive interface that enhances usability and improves retention.
- Choose the tech stack: Select programming languages such as Java or Kotlin and tools like Android Studio. These choices directly affect performance, scalability, maintainability, and development efficiency.
- Develop the functionality: Develop the app’s core features by coding both the front-end (UI) and back-end (databases, APIs). Integrate navigation, data storage, and user interactions to connect the Android app interface with backend logic and ensure stable performance.
- Test the app: Conduct unit and UI testing to identify and fix bugs. Use frameworks and tools like Android Studio’s emulator to confirm compatibility across Android devices and deliver a stable, user-friendly app.
- Deploy the app: After testing, deploy to the Google Play Store. Generate an optimized APK, ensure compliance with Play Store requirements, and apply ASO (App Store Optimization) techniques for better visibility. Publishing the Android app makes it accessible for users to download.
How To Create An Android App With Android Studio
To create an Android app with Android Studio, you must set up Android Studio, create a project, and use Android’s APIs to implement the desired features, write the Android app code, and test the app. Android Studio is an integrated development environment (IDE) that includes tools for coding, debugging, and testing apps.
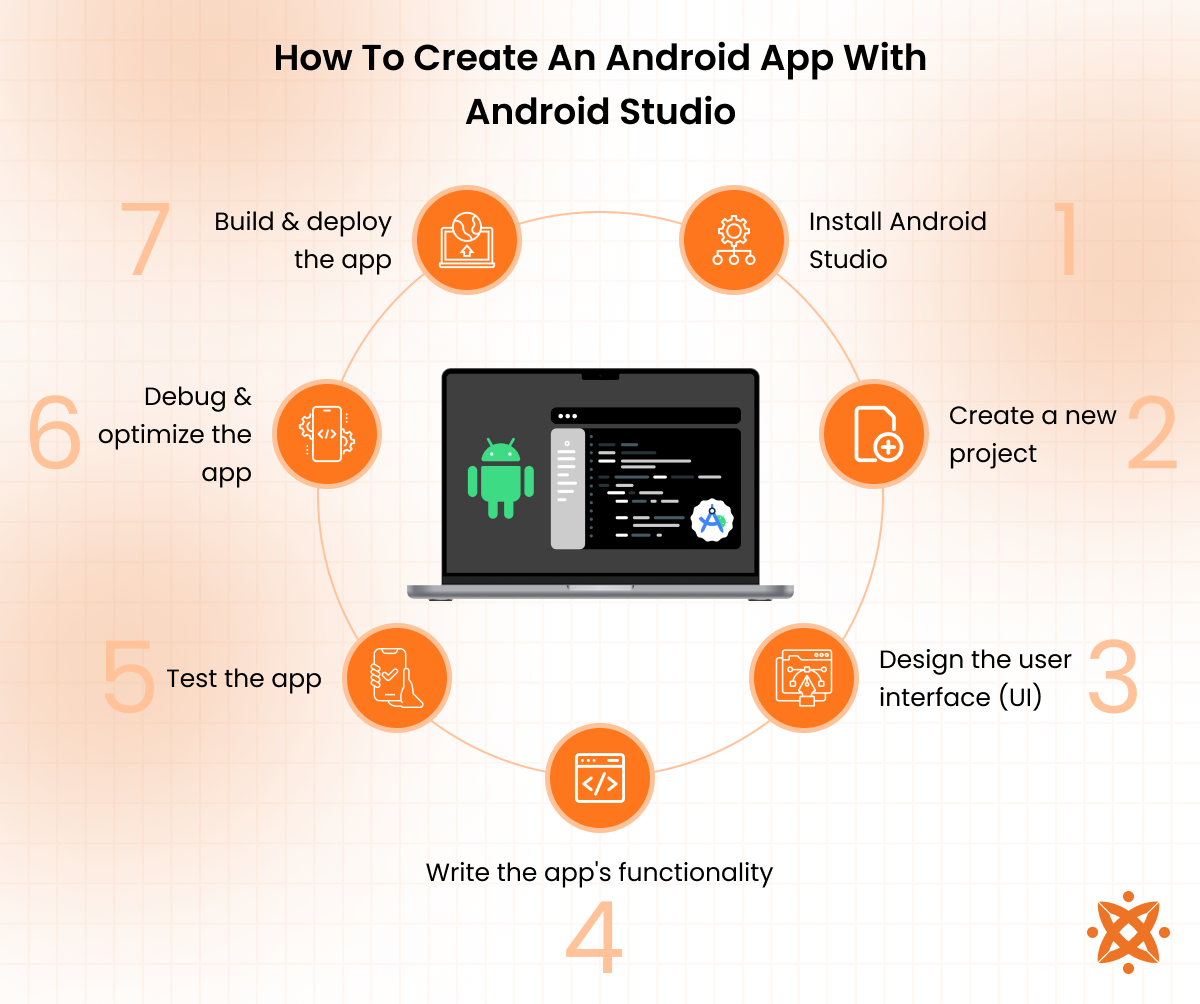
To create an Android app with Android Studio, the steps to follow are explained below:
- Install Android Studio: Install Android Studio and configure the IDE with the required SDKs and tools. Proper setup ensures the environment is ready for development.
- Create a new project: Create a new project by selecting a template in Android Studio. The template provides a basic structure, such as MainActivity and resources, to begin development. Choose one that matches the app’s purpose, from a single activity to a multi-screen application.
- Design the user interface (UI): Design the interface using Android Studio’s Layout Editor and XML files. Drag and drop components such as buttons, text fields, and images to build screens. An intuitive UI aligned with the app’s functionality improves usability and retention.
- Write the app’s functionality: Using Java or Kotlin, write the code that powers the app’s features. This includes defining the logic for user interactions, data management, and back-end integration. Android Studio provides code completion and real-time error checking, which reduces coding errors and accelerates debugging during development.
- Test the app: Test the app with Android Studio’s emulator on virtual devices and on physical devices by enabling developer options and connecting them to the IDE. Testing the Android app with emulator and physical devices ensures the app functions correctly across different device types and screen sizes.
- Debug and optimize the app: Use debugging tools like Logcat to trace and fix errors. Monitor performance with Android Profiler to detect issues such as memory leaks and ensure the Android app runs efficiently before deployment.
- Build and deploy the app: Once the Android app is tested and ready, generate an APK file for Android devices. Following the Play Store submission guidelines, publish the APK to the Google Play Store. Ensure all metadata and requirements are fulfilled to make the Android app accessible to users.
How To Maintain An Android App After Deployment?
To maintain an Android app after deployment, you need to monitor app performance, address user feedback, and release updates for bug fixes or new features. App maintenance keeps Android apps compatible with newer Android versions and aligned with evolving user requirements. Regular updates support user retention by fixing logged errors, optimizing load times, and maintaining compatibility with the latest Android OS versions.
To maintain an Android app after deployment, the steps to follow are:
- Monitor app performance: Use tools like Firebase Analytics or Google Play Console to track performance. Monitoring helps detect issues such as crashes, errors, or slow load times.
- Address user feedback: Collect and review user feedback from Play Store reviews, in-app feedback forms, or support channels. Respond to users promptly and prioritize fixes based on common complaints or highly-rated feature requests.
- Release updates: Release updates regularly to fix bugs, enhance performance, and add features. Test thoroughly before submission to avoid new issues, and publish to the Play Store in line with versioning guidelines. According to Statista’s Mobile App Update Frequency Report (2023), around 68% of mobile apps receive at least one update per month — a trend that supports both user retention and long-term compatibility.
How To Optimize Android App Performance?
To optimize Android app performance, developers must profile the app, reduce resource consumption, and improve code and data efficiency. Performance optimization lowers app latency, reduces battery drain during active sessions, and maintains stable responsiveness across devices.
To optimize Android App performance, the steps to follow are:
- Profile the app: Use Android Studio’s profiling tools to monitor CPU, memory, and network usage. Profiling the app identifies bottlenecks and ensures performance issues are caught early in development.
- Reduce memory usage: Reduce the app’s memory footprint by using efficient data structures and managing resources carefully. This prevents memory leaks, lowers consumption, and improves stability and responsiveness.
- Optimize network calls: Optimize network performance by minimizing latency and streamlining data transfers. Use caching and asynchronous calls to reduce loading times, improving speed and reliability even on slow networks
How To Choose An Android App Development Company
To choose an Android app development company, consider factors like expertise, project portfolio, cost-effectiveness, and timeline management. These considerations ensure you select an Android app development company that meets your specific app requirements and delivers quality results.
To choose an Android app development company, the factors to consider are as follows:
- Evaluate expertise and experience: Look for companies with a proven track record in Android development. Teams experienced in Android Studio, Jetpack Compose, and Firebase implement solutions that comply with current Android development standards and ensure stable app releases.
- Assess project portfolio and case studies: Review the company’s past projects, such as e-commerce apps or fitness trackers, to understand its capabilities. A strong portfolio showcases its competence in handling various complexities and meeting client expectations, which helps determine its suitability for your specific project.
- Consider cost-effectiveness and timeline management: Select an Android app development company that delivers within budget and timelines while meeting code quality and usability standards.
The right company turns the client’s Android app idea into a successful product. For clients in the USA and Canada, Intelivita stands out as a reliable and results-oriented development partner. With years of experience and a robust portfolio, Intelivita offers efficient, cost-effective, and high-quality Android app development services customized to your specific needs.